In today’s fast-paced digital world, fostering creativity and imagination in children has never been more crucial. One way to encourage outdoor play and unleash their inventiveness is by building a DIY mud kitchen—a simple yet delightful DIY project that promises endless hours of messy, immersive fun.
The Basics of a DIY Mud Kitchen
A mud kitchen is essentially an outdoor play kitchen where children can mix, stir, and concoct their culinary creations using natural materials like mud, water, leaves, and stones. It’s a space where they can engage in sensory exploration, develop fine motor skills, and learn about the natural world around them.
Materials You’ll Need
1. Wood or Recycled Furniture:
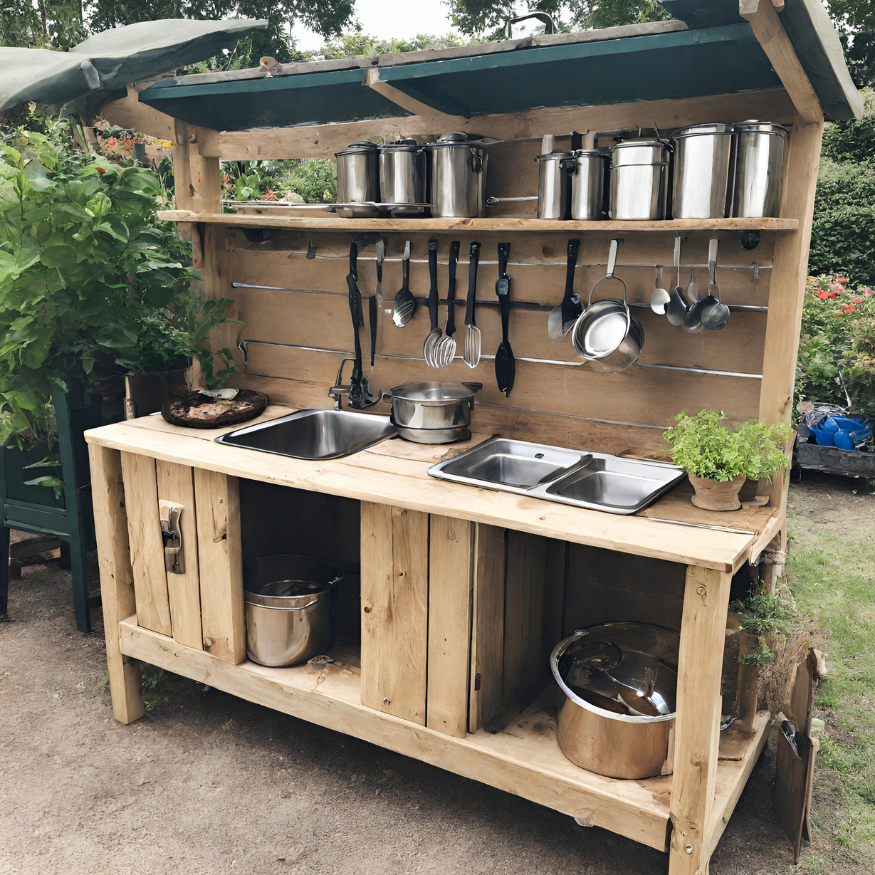
- Consider repurposing old wooden pallets, crates, or kitchen cabinets to construct the frame of the DIY mud kitchen.
2. Work Surface:
- A sturdy countertop or tabletop where children can “cook” and experiment.
3. Water Source:
- Attach a faucet or install a small basin for easy access to water.
4. Storage Containers:
- Utilize pots, pans, bowls, and jars for holding mud, water, and other materials.
5. Accessories:
- Add hooks for hanging utensils, shelves for storing ingredients, and even a chalkboard for writing menus.
Building Your DIY Mud Kitchen
- Design and Plan: Sketch out your mud kitchen design, considering the available space, materials, and safety precautions. Keep it simple and age-appropriate for the children who will be using it.
- Gather Materials: Collect the necessary materials, ensuring they are durable and safe for outdoor use. Involve children in the process to spark their excitement and sense of ownership.
- Construct the Frame: Assemble the wooden frame or repurpose existing furniture to create the structure of the mud kitchen. Secure it firmly to the ground to prevent tipping over during play.
- Install Work Surface and Accessories: Attach the countertop or tabletop to the frame, leaving enough space for children to comfortably play. Add hooks, shelves, and other accessories for organization and convenience.
- Add Water Source: If incorporating a water feature, install a faucet or basin and connect it to a water source. Ensure proper drainage to prevent water accumulation.
- Decorate and Personalize: Let children unleash their creativity by decorating the mud kitchen with paint, stickers, or natural materials like shells and pebbles. Encourage them to personalize their space and make it their own.
Benefits of a DIY Mud Kitchen
- Encourages Imaginative Play: Children can role-play as chefs, explorers, or scientists, fostering creativity and imagination.
- Promotes Sensory Exploration: Engaging with natural materials like mud, water, and sand stimulates the senses and enhances sensory development.
- Develops Motor Skills: Pouring, mixing, and stirring ingredients in the mud kitchen promote the development of fine motor skills and hand-eye coordination.
- Fosters Collaboration: Mud kitchens provide opportunities for children to collaborate, communicate, and problem-solve together, promoting social skills and teamwork.
Building a DIY mud kitchen is not just about creating a play space; it’s about nurturing a child’s curiosity, creativity, and connection to nature. By embracing the mess and allowing children to explore and experiment, we empower them to become confident, resilient, and resourceful individuals. So, roll up your sleeves, gather your materials, and embark on the journey of building a mud kitchen—a magical world where imagination knows no bounds.

My kids absolutely love the real sink!